The final post in creating your first cigar box guitar is finally here. Hopefully the guitar sitting before you is something you take pride in, as any craftsman should take pride in his work. You've done a great job of following the steps up to this point. If you'd like to later, send in your finished guitars and I'll feature them in their own exclusive posts on the blog!
Once again, thank you for taking time to learn about the wonders of the cigar box guitar. I hope it was a truly eye opening experience, to be able to take part in the creation of a musical instrument, and I hope this first guitar of yours is one of many to come.
I've taken the liberty of preparing this final step in podcast form, mainly because it will make the process easier to understand for those who have never tuned a guitar before, or even tuned an instrument in general. In this podcast I take one of my own cigar box guitars, detune it, and walk you through bringing yours and mine up to an Open G tuning, the standard tuning of a cigar box guitar. Listen below:
Tuesday, November 24, 2015
Monday, November 23, 2015
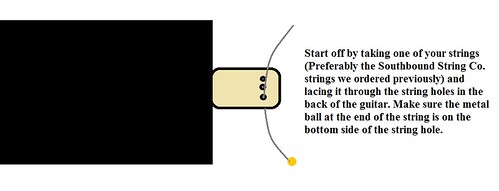
Stringing the Guitar Up (Finally!)
We're nearing the end of our journey on the creation of your first cigar box guitar! Needless to say it will be bittersweet, but I have a plan for this blog upon finishing. I would love to showcase my viewers' guitars, if any have finished building theirs.
Stringing up a guitar is a useful skill that any musician should be able to do. Get used to it too, as you'll have to do it quite often. I recommend changing strings on your instrument once every two months.
To simplify this process, I've prepared a photo sequence that will walk you through the steps on how to apply strings. Good luck!
 |
| Slideshow via Flickr, graphics by Mark Feuerborn. |
Monday, November 2, 2015
Making Your Mark
 |
| Here's a guitar I crafted for a televised auction by PBS. My brand is clearly visible from the headstock, like on most traditional guitars. I utilize that same stylized "F" on all of my cigar box guitars. (Photo by Mark Feuerborn.) |
This is a rather self-explanatory step, as your design for your brand is entirely up to you to create. Keep in mind that this is the part of the guitar that really exemplifies your personal flair. This post is aimed at merely explaining the best method for applying the design.
I typically use acrylic paint when I'm painting on my headstock, as this seems to apply well and dry quickly on the wood we have already spray-painted. Use delicate strokes with your paint brush, and keep a cutip nearby to use to rub out mistakes. Be careful, as it is very difficult to fully erase acrylic paint from this surface.
Other than taking appropriate steps to ensure proper application, the rest is up to the designer. Let your creativity show in your brand.
Sealing the Cigar Box (Optional)
 |
| Utilizing flat-head screws and a clamp can make sealing the cigar box a simple task, and also add a little design flair. (Photo by Mark Feuerborn.) |
This is a step that is mostly dependent on the cigar box, some boxes already have a latch of some sort that functions well enough that sealing is not needed. In some cases though, sealing the box may help to take care of any loose fit between the lid and the box. Also, before beginning, ensure that there is nothing else to take care of inside the box, such as installing the piezo pickup.
Small finishing nails or even screws (preferably flat-head) can be utilized. If using nails, space them out appropriately where the lid meets the side of the box and hammer away. If using screws, drilling pilot holes helps in guiding the screws into their places initially.
Make sure not to drive the nails or screws in too tight, to where they are pulling the lid inward on the box, as this can break the box over time. A slight curve outward is acceptable, however, and in some cases beneficial.
Subscribe to:
Posts (Atom)