The final post in creating your first cigar box guitar is finally here. Hopefully the guitar sitting before you is something you take pride in, as any craftsman should take pride in his work. You've done a great job of following the steps up to this point. If you'd like to later, send in your finished guitars and I'll feature them in their own exclusive posts on the blog!
Once again, thank you for taking time to learn about the wonders of the cigar box guitar. I hope it was a truly eye opening experience, to be able to take part in the creation of a musical instrument, and I hope this first guitar of yours is one of many to come.
I've taken the liberty of preparing this final step in podcast form, mainly because it will make the process easier to understand for those who have never tuned a guitar before, or even tuned an instrument in general. In this podcast I take one of my own cigar box guitars, detune it, and walk you through bringing yours and mine up to an Open G tuning, the standard tuning of a cigar box guitar. Listen below:
Tuesday, November 24, 2015
Monday, November 23, 2015
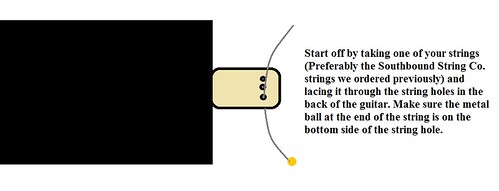
Stringing the Guitar Up (Finally!)
We're nearing the end of our journey on the creation of your first cigar box guitar! Needless to say it will be bittersweet, but I have a plan for this blog upon finishing. I would love to showcase my viewers' guitars, if any have finished building theirs.
Stringing up a guitar is a useful skill that any musician should be able to do. Get used to it too, as you'll have to do it quite often. I recommend changing strings on your instrument once every two months.
To simplify this process, I've prepared a photo sequence that will walk you through the steps on how to apply strings. Good luck!
 |
| Slideshow via Flickr, graphics by Mark Feuerborn. |
Monday, November 2, 2015
Making Your Mark
 |
| Here's a guitar I crafted for a televised auction by PBS. My brand is clearly visible from the headstock, like on most traditional guitars. I utilize that same stylized "F" on all of my cigar box guitars. (Photo by Mark Feuerborn.) |
This is a rather self-explanatory step, as your design for your brand is entirely up to you to create. Keep in mind that this is the part of the guitar that really exemplifies your personal flair. This post is aimed at merely explaining the best method for applying the design.
I typically use acrylic paint when I'm painting on my headstock, as this seems to apply well and dry quickly on the wood we have already spray-painted. Use delicate strokes with your paint brush, and keep a cutip nearby to use to rub out mistakes. Be careful, as it is very difficult to fully erase acrylic paint from this surface.
Other than taking appropriate steps to ensure proper application, the rest is up to the designer. Let your creativity show in your brand.
Sealing the Cigar Box (Optional)
 |
| Utilizing flat-head screws and a clamp can make sealing the cigar box a simple task, and also add a little design flair. (Photo by Mark Feuerborn.) |
This is a step that is mostly dependent on the cigar box, some boxes already have a latch of some sort that functions well enough that sealing is not needed. In some cases though, sealing the box may help to take care of any loose fit between the lid and the box. Also, before beginning, ensure that there is nothing else to take care of inside the box, such as installing the piezo pickup.
Small finishing nails or even screws (preferably flat-head) can be utilized. If using nails, space them out appropriately where the lid meets the side of the box and hammer away. If using screws, drilling pilot holes helps in guiding the screws into their places initially.
Make sure not to drive the nails or screws in too tight, to where they are pulling the lid inward on the box, as this can break the box over time. A slight curve outward is acceptable, however, and in some cases beneficial.
Tuesday, October 27, 2015
Preparing the Nut and Bridge for Strings
This is a fairly simple step, and one that won't take very long. It is still important to be careful during this process, however, as a mistake could ruin your nut or bridge.
We will only need a knife and a ruler, preferably a long one. There are a few ways of approaching this step, depending on how far apart you want your strings to rest from each other going across the fretboard. You can choose to line your notches in the bridge up with the string holes in the backside of the fretboard, or measure out your own equidistant notches on the bridge and nut. The key is just to remember to line the notches on the bridge and nut up in the end.
Once you've gotten the notches measured out, and hopefully marked, grab your knife. Press the blade into the marks and perform a sawing motion. Don't go too deep into either the bridge or the nut, or the strings will not catch in them and they will be useless. In fact, make the notches very small to begin with, and wait until the next step to deepen them if needed. We will talk about stringing the cigar box guitar up in the next step.
Attaching the Fretboard to the Box
We've successfully taken care of putting frets on the guitar, so we're close to having our guitar ready. This next step takes care of one of the final preparations on the guitar. We're about to attach our fretboard and cigar box.
We will need wood glue (I use Elmer's), six finishing nails which are somewhat small, just below an inch in length, and a hammer. Apply a small amount of wood glue to the indented section of the fretboard that goes inside of the box. Close the lid, and using the two protruding sides of the fretboard as handles, gently pull the box and fretboard together. Keep reading ahead while doing this however, as you made need to open the box while the glue dries. While doing this, make sure that your bridge and nut still measure up to the exact same scale length as before.
If the cut out sections on your cigar box have provided enough wiggle room to allow you to open the box while still keeping the fretboard attached, do so and wipe off any excess wood glue that has flowed out from the box. If you don't have this kind of wiggle room, do not let the glue dry very much before opening the box and separating the fretboard and box. Wipe off any excess glue and begin attaching them again.
Once the glue has had some time to dry, grab your nails. We will put two on each end of the lid of the box in the space where the fretboard rests underneath. Space them out evenly, and take care in where you place them. Remember that the strings will also be right above them, so hammer the nails in as far as possible. I always hammer mine in to where the head of the nail is flush with the lid of the box.
If you would like a cigar box guitar that still opens in spite of the fretboard being attached, you only needed those four nails and are done! If you would like to seal the box, go ahead and put finishing nails in the side of the lid that rests on top of the side of the box.
Monday, October 19, 2015
Frets on the Fretboard
 |
| On my cigar box guitars, I prefer to paint on frets as opposed to placing fretwire. This allows for smoother slide playing. (Photo by Mark Feuerborn.) |
Here, you'll be prompted to input your desired number of frets (the average number is 19 to 22), and to put your guitar's scale length in. Find your scale length in inches, then convert it to millimeters and input that number for the scale length. The Fret Calculator will also ask you to input your specific instrument, though this is not relevant as we have already determined the bridge placement. It doesn't hurt to select acoustic guitar, in any case.
After putting in all requested information, the calculator will yield the positions of every fret, measured by their distance from the nut. The measurement should be given in millimeters, while most rulers have centimeters on them. To measure with the ruler, move the decimal point on the millimeters over to the left once and the results will now be in centimeters. Proceed to place your ruler's zero mark on the nut, then mark off the fret positions based on their position from the nut.
After marking out all frets, grab a paintbrush and paint up the lines that will now clearly depict your guitar's frets. If you're looking to get even more detailed, the dots seen on a common guitar's fretboard are meant to be put on the 3rd, 5th, 7th, 9th, 12th, 15th, 17th, and 19th frets.
Subscribe to:
Posts (Atom)